


Build Advice
For any setup to work, it is really important to assemble the car correctly. Below I have outlined a few points:
-
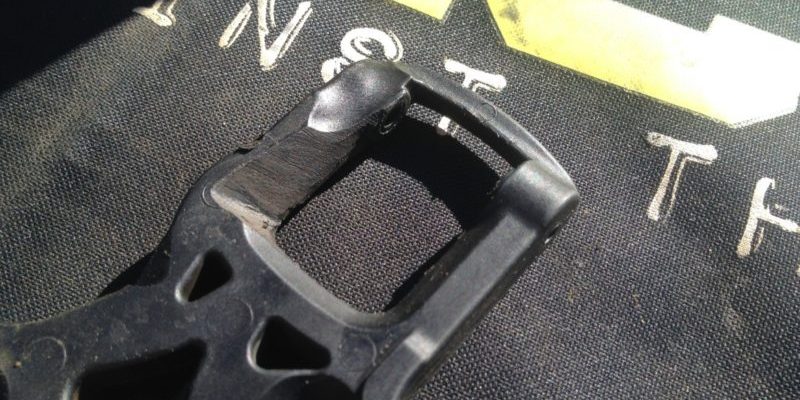
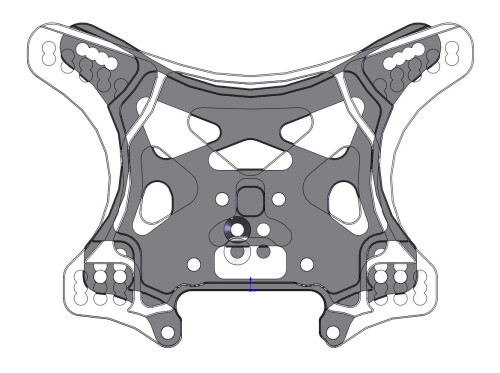
The front arms need grinding in order to increase the down travel. The reason the arms aren’t right from the start, is that originally the c hub geometry was quite different. The arm was already moulded when the c hub was changed, and this resulted in the front end not having sufficient down travel. This is why we strongly recommend everyone busts out the dremel and increases the clearance for the c hub, and also for the chassis tab. You need to be able to get 102.5mm front shock length.
-
The bearings in the hubs will not be 100% free when new. This is because there is a crush washer between the bearings, and tightening the grub screw in axle squeezes the bearings towards each other, ”crushing” the spacer, and thus eliminating play. The best way to make it work is loctite the grub screw and only make it snug, don’t actually tighten it with force. This keeps the pin in, eliminates play, but does not increase the friction in the bearing. You will feel slight resistance with new bearings, whatever you do. After you run the car, this will go away! This is due to the grease used in the bearing.
-
I strongly recommend the CNC servo saver top (JQB0175 or JQB0287) and the hard arms. (JQB0370 and JQB0371). They will improve the performance of the car.
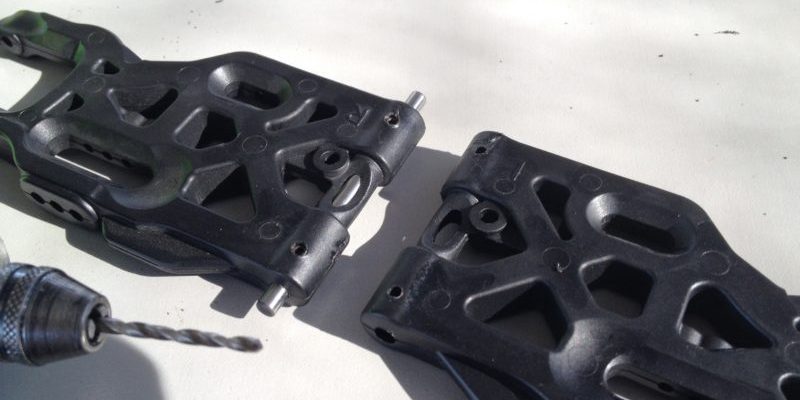
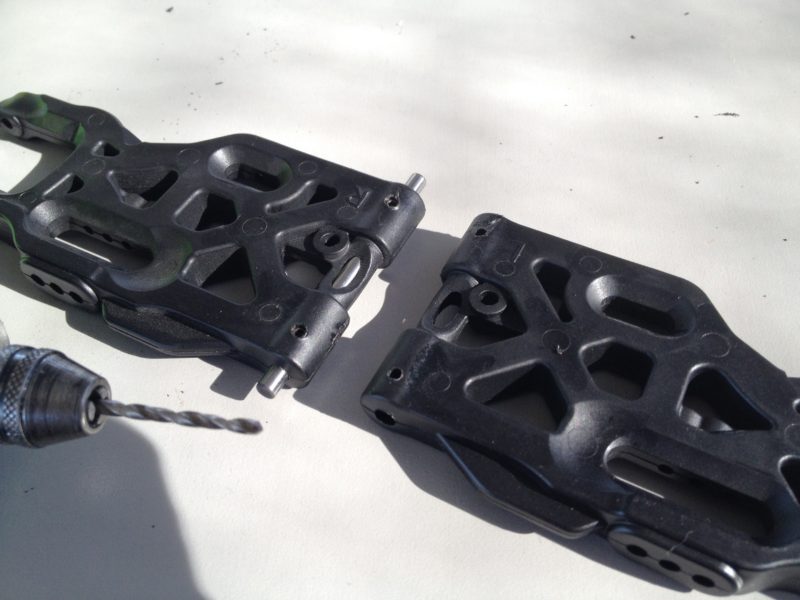
- One minor problem we have with the hard arms is the play on the hinge pin. A way to remove the problem is to drill small holes (2.5mm or so) in the arms, and use grub screws to reduce the play. Always make sure that the arm is still free when you do this. By adjusting the grub screws you can remove all play, and you actually end up extending the life of the arms by a lot! In the future we hope to improve the fit of the arms, but even then this idea will work to increase the life of the arms.

Setup
The standard setup that comes with the kit should work well everywhere. If not, something is wrong, and we would like to hear your feedback. Please email jq@jq-products.com Thank you.
The QUAGRAINE Starting setup is slightly modified from this. The changes and the reasons:
-
The rear link is short on the hub due to more steering and response. The longer link makes the rear too planted for me.
-
The rear shock is laid down one hole. This increases steering in low speed hairpins, and I just prefer the suspension feel.
More recently, I have begun running both front and rear shocks all the way stood up.
Smooth vs Bumpy Tracks
For a really bumpy track, the things you should try are reducing the rear anti squat, buy using insert 1 hole up on the R-R (D-plate). This makes the anti squat 1 degree from original 2. You can also go to 0.5 insert hole up on the R-F (C-plate) to further reduce it to 0.5 degrees anti squat. The car will handle the rough stuff better, but it will have less pop off jumps, and on rough jump faces the rear might kick up if you don’t hit it perfect. You will also have a bit less steering.
You should also try maximum front kick up, by going to a 1 insert hole down on the F-R (B-plate). This will make the car smoother in the bumps. It’s not as a big of a change as the anti squat, but doing both together really improves the car in bumps.
Finally you should try moving the rear hub back 1 step, to the middle. This normally helps the car go through the bumps.
Those three changes are really the only changes I make. If it still doesn’t feel right, I try different diff oils, usually thinner oils are easier to drive, so maybe 6-6-3, or 8-5-3, it depends on the situation.
In Conclusion
Smooth Track
- Stock setup
- Try slightly less down travel, 1-2mm shock length.
- 25-27 ride height.
Bumpy Track
- Less anti squat
- Move rear hub 2 step back
- Thinner diff oils, 6-6-3
High vs Low Grip Tracks
The standard setup should always work, but what I have found, is that for a low grip track, I just go to one thinner sway bar on the rear, a 2.4mm. That’s normally it. I leave the front one. I may also reduce camber, and even run 0-0.5 front and 1 rear. These changes give the car a bit more traction, and give the rear a bit more grip vs the front, which makes the car easier to drive. If the balance is good, but I need the car to roll more and generate more traction overall, I will just go to 2.2 front, 2.4 rear sway bars.
Another good change to make on a loose track, is to just lower the upper links, front and rear on the hubs, to the lower row. Keep everything else the same, just lower the links. This makes the car feel more connected and stuck to the track. If it doesn’t feel right, try lowering the links on the tower too. So basically you are going one step lower on tower and hub, maintaining the same link angle, just lowering it. When the traction goes up, the car will want to flip over easier, and that is why I start off with the links high.
On a high grip track, the basic setup is really good. If its really high, and also high speed, maybe go to thicker sway bars, 2.4/2.6. If needed, maybe up to 2.8 on the rear. Harder springs could also be good, specially on the front. I have found that in addition to the JQ black springs, you may want to try the HB Gold and Yellow springs on high bite tracks. Harder diffs also make life easier, going up to for example 12.5-10-5 on a very high bite track.
Another good setup change is to move the rear hub 1 step back, so it is in the middle. Also make sure you aren’t running a too high ride height. Lowering the car a bit on high bite helps, for example 25-26mm front, 26-27mm rear, or same front and rear. finally reducing the down travel slightly, by only 1-2mm of shock length usually helps get the car around the track. Most of the time however, tracks get a bit rough and hard to drive in the mains, and I end up running my normal down travel for the mains.
On a high bite track the stock arm positions tend to work best. Harder springs and sway bars, rear hub back, and thicker diff oils are really the only required changes in order to make the car comfortable to drive.
In Conclusion
High Grip
- Harder springs, JQ black, HB gold, HB yellow.
- Thicker sway bars, 2.4 front, 2.6 or 2.8 rear. Thicker front sway bar may actually make car more nervous, try it to see.
- Rear hub one step back to middle.
- Thicker diff oils, 10-10-5, 12.5-8-5, 12.5-10-3. Play around, find what you like.
- Move steering link on ackermann plate to the rear, to smooth out steering.
- Try slightly less down travel, 1-2mm shock length.
Low Grip
- Keep grey springs
- Lower links 1 hole on tower and hub from where you are running them, front and rear.
- Thinner sway bars, 2.2/2.4, or keep front 2.3 if car has too much steering.
- Thinner diffs, 6-6-3 works really well.
- You can try 1 deg rear anti squat for more traction.
Gearing Explained
The difference between the Smooth Gearing 43/13, 46-48/13, 43/13, and the Even Smoother 45/14, 47-49/13, 45/14 is noticeable, but quite tricky to explain, because it’s not quite straight forward. In general, the 43/13 gearing is ”punchier”, you need less run up to jumps in order to clear them, as the car accelerates harder, it’s better for small tight tracks. The even smoother, 45/14 gearing maintains momentum better, but doesn’t accelerate as fast from a low speed to clear a jump for example. So you could say, smooth gearing, 43/13 for tight technical tracks, and even smoother 45/14 for large, fast, sweeping ”euro style” tracks, but you would be mistaken, and here is why.
With the smooth gearing, 43/13, the car accelerates more, but not initially. Say you let off the throttle for a corner, the car slows more, so it is easier to control. Then you add just a little of throttle, and the car won’t do much, at first, you need to pull the trigger or push the stick more, you need to get deeper into the throttle before the car really starts accelerating, so you don’t need to be so careful and precise. Basically you can stay in control, and drive around the track with more throttle applied.
If you look at the video above, the sections where this was really evident was the right hand corners at 9 seconds and at 16 seconds, where after changing to this gearing I actually stopped because I wasn’t pulling the throttle enough. Also at 13 seconds, accelerating up to the jump I needed to apply more throttle, however, let’s say I made a mistake in the corner and lost all my speed, I could now easily clear the jump, where before I had to maintain my speed. Finally, the whole section starting at 25 seconds all the way to the back of the track, I had to use more throttle, so it felt like I was driving more punched to go fast.
43/13 Smooth Gearing: Basically you can stay in control, and drive around the track with more throttle applied.
With the even smoother 45/14 gearing, the car naturally carries more corner speed, so you have to make sure to brake enough to slow down. Also, when you then just barely touch the throttle, the car will go a lot more, so you can’t pull the trigger too much, you have to ”baby” it around corners more. You also need to maintain your momentum and flow around the track. It’s not as good if you point and shoot, then you are better off with the smooth gearing, 43/13. However, it has been our experience, that average racers prefer the even smoother gearing, and that is why we include it as stock with the LV kits. It takes less effort, and less throttle to go fast, and traction is very consistent.
If you look at the video above, it’s the opposite to before, the sections where the gearing was really evident was the right hand corners at 9 seconds and at 16 seconds, where with the even smoother gearing the car will maintain it’s speed, and you just barely touch the throttle. Also at 13 seconds, accelerating up to the jump I needed to make sure to maintain my speed to easily clear the jump. Finally, the whole section starting at 25 seconds all the way to the back of the track, I was barely using the throttle while cornering, and it was easier to flow around this section and maintain corner speed.
45/14 Even Smoother Gearing: It takes less effort, and less throttle to go fast, and traction is very consistent.
The gearing isn’t really a setup change that is used from track to track. Both produce the same lap times, it comes down to driver preference. It’s hard for me to even decide on which one I prefer. The past couple of years I have been racing with the even smoother gearing, now I am giving the smooth gearing a try.
Shock Bladders
As THECar is now performing very well, we have began experimenting with other setup features that have been popular over the last few years. One such thing is the bladders. What we have found is that cutting the stock bladder so it is basically an O-ring, and building the shocks as emulsion shocks, the car feels more plush, and holds it’s line better in long corners, indicating that it has more grip, it’s slightly more locked in. However, the biggest difference is how it pops off jumps and lands. It pops less, and doesn’t want to ”double-bounce” on landing. It just lands and soaks it up nicely. It’s easier to drive the car specially in situations where you land a jump into a corner and have to immediately accelerate into the next section. The car settles faster and just goes.
If you look at the video above, the step on step off is one area where you notice a difference. The car lands and settles better when jumping on, which makes jumping off easier, even though you do lose a bit of “pop” on the jump. When jumping off it is also easier to carry speed through the corner and into the next section.
Another area where the emulsion shocks were clearly better, was flat landing at 34 seconds, and maybe most evidently negotiating the following double double and accelerating onto the front straight. Where before you had to be careful, land well, and then accelerate, now it was a lot easier and did not require the same precision.
So for now we are running emulsion. I can see emulsion being worse on very high traction, or when you need more snappy response and “pop” over jumps. Again, both bladders and emulsion works, but emulsion is easier to drive.
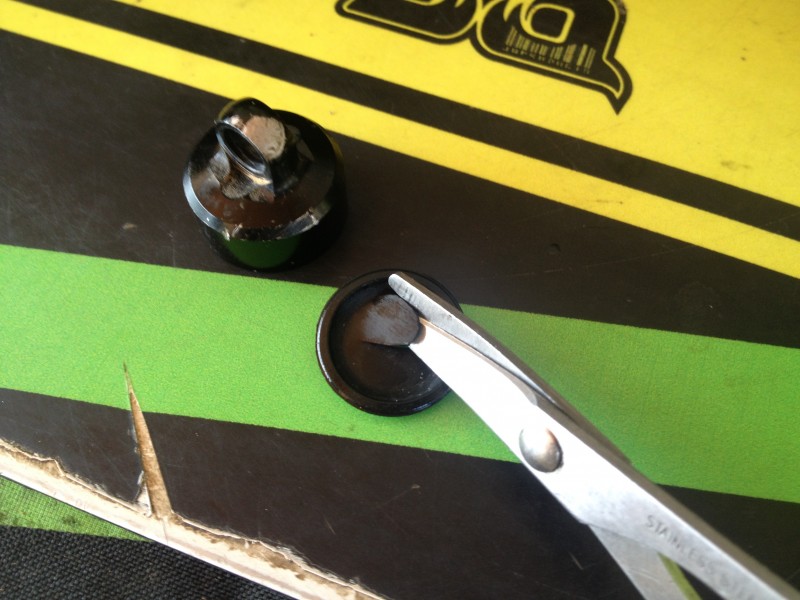

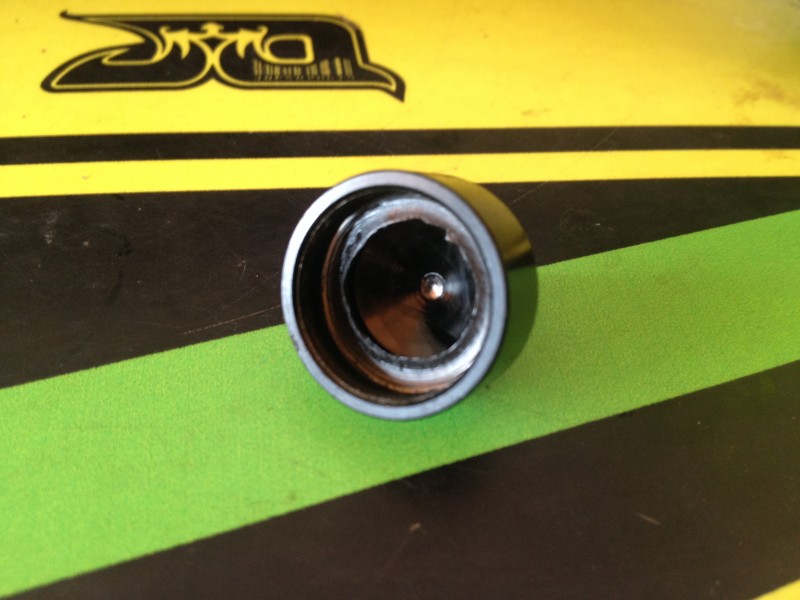
Cut the stock bladder…
…so it looks like this,
and just assemble it normally into the cap.
To build the emulsion shocks, you follow the exact same steps as with a regular shock with a bladder. I put a bit of oil in the cap too. I screw the cap on a turn or two, hold the shock at an angle with the bleed hole facing up, push the shaft in so 3mm remains visible, and turn the shock body slowly, letting the excess air and oil out. If you can feel the damping get harder as you move the shock shaft in when you are done, open the cap 3/4 of the way, with the shaft extended, and repeat the process. I build the shocks so they are dead. After working the shock for a few seconds the shaft remains where I leave it with 3mm visible.
Down travel
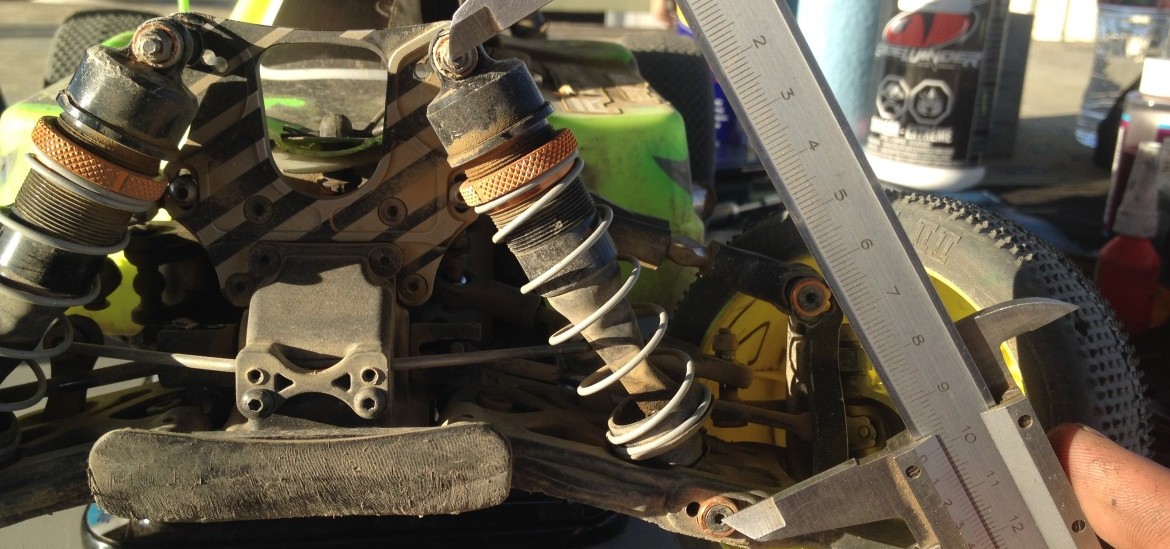
After extensive testing, we have found, that the best shock lengths range from 99mm-102.5mm front, and 120mm-123mm rear. Down travel is a good setting to play with from track to track. It’s best to start off with the maximum setting and reduce 1mm at a time. I have written some more about droop here.
Important Advice
One thing we realised with the original WE was that some drivers would exaggerate their setup changes. For example, if we say a long link is more stable, they would go to a link which was as long as possible. That doesn’t really work with setting up a car, a change in a certain direction will be better up to a point, and then going too far will be worse again. We have eliminated a lot of these possibilities now, but please keep this in mind.
The setups mentioned in this guide work well, and are close to what you will want. This means, that we recommend you stay close to what we post. If you are not happy with the handling, it is most likely as easy as adjusting for example your down travel by 1-2mm shock length, camber by 1-2 degrees (0,5-1,5mm link length), sway bar by 0.1-0.2mm and diff oils buy a couple of K. Going overboard is not a solution.
For the most up to date set ups, please check out set up page.
Any Questions
If you have any questions regarding setup, please just email me or Liam, jq@jq-products.com or justliam@jq-products.com, or contact us on Facebook. Thank you for your continued support!