

Explaining to someone how to set up a car is extremely difficult, because the subject is very complicated, and no one can claim to know exactly what is going on at all times, and how things actually interact with each other. Car set up is constant searching, learning, and work in progress. We have tried to gather the most valuable information for you and compress it here into an as short as possible and as simple as possible set up guide. For more in depth explanations and theories please read our guides on our website.
One thing to keep in mind, is that the set up changes can have differing effects on the handling depending on traction levels of the track, and the driver’s driving style and skill level. To truly get the most of this and other guides, and for you to understand how to set up the car, there are no shortcuts. You need to take the time to try changes one by one, record lap times, and note down what you feel happens. Repeat this over and over at different tracks. Read this and other guides over and over. Then repeat again. This is the only way to learn. Good luck!
BE Setup Advice Sheets
BE Option Parts and Tips ENGLISH – FRANCAIS – PORTUGUESE – ESPANOL

THE Golden General Rules
*Do always check our website. There is a ridiculous amount of information there, in video and text form.
*There is no reason to feel overwhelmed with set up options. Just because they are there does not mean you have to try them all. Stick to the standard set up if you don’t want to experiment. We have spent an enormous amount of time developing this car to where the standard set up will work well for anyone on any track. If you realise you want the car to do something different, check our “Brainstorming Section” in this manual for a simple idea or two to try.
*If you get lost, revert back to our standard set up. You will always find our most up to date standard set up on our website. We are constantly improving it.
*Read the guidelines in this manual. It is possible to set the car up in ways that will make it perform badly. Remain within the options we explain later in the manual.
*Camber tends to work the best when it is 0-1.5 degrees on the front, and 1.5-3.5 degrees on the rear. If you want to really feel the effects of camber, and find your very own sweet spot, have your mechanic make changes of two flat spots on the turn buckle at a time, quickly in pit lane, and keep on driving until you find a setting that you are most comfortable with. It makes an unbelievable difference.
* For the adjustable weight distribution, arrows back on mount, front mounting holes is a very good general set up (stock setting). It works everywhere. For a very “jumpy” tight track, moving the engine all the way forward (arrows and engine forward), may be better. These are the only locations we use. We don’t use the rear holes, but if you like, you can try them!
*The upper links, with which you set the roll centre of the car, are arguably the most complicated to explain and to understand. Here track conditions and driver input play a large roll. A driver that pushes the car to the level “X” may prefer a certain setting, while another driver pushing it beyond level “X” may cause the car to do unexpected things due to the setting only being good to a certain point. The traction level of the track may also cause similar situations.
*Whatever you need, just ask us. We are here to help you.

Upper Camber Links
In general, a shorter, or more angled (lower on the inside than outside) link will make the car more aggressive, responsive, and will provide more traction up to a point, after which it goes away suddenly. It will also be more nervous, and want to flip over more in bumps or on high grip. A longer or less angled link will make the car more stable, and less responsive, and will provide more even traction, with the loss of traction happening smoother, but it will also be harder to save it, and get back in control. The car will also feel like it is “in the track” more, and will be a lot less likely to flip over in bumps, or on high grip. Applying more throttle will actually keep the car from flipping over, and help you gain control in tricky situations. This is how the car is set up as standard.
Some Advice: Over the years we have realised that the links work very well on all tracks in the same positions. We mainly use other ways to set up the car, sway bars, springs, down travel, anti squat, toe in, camber. Only if we feel that the balance of the car is very wrong, do we venture into changing link positions, or if we already tried the other options, and are still searching.
-
In loose conditions, try lowering the rear link, 1 hole on the hub and the tower.
-
For more aggressive drivers, and for more steering, try angling the link one hole in the rear, so top hub middle tower, or lower hub lower tower.
-
For smoother steering raise the link to the top hole on the front tower. For most aggressive steering lower it to the lowest hole. The standard setting is in the middle, and will work everywhere.
-
For a different steering feel, lengthen the front link on the c hub.
-
Almost always run the top hole on the c hub. If you are desperate, and you need more steering on a slippery track, try the lower hole on the hub, and lowest on the tower.
- On the rear we almost exclusively run the link inner top on tower, middle top on hub with long arm on high grip, and middle inner on tower, and middle lower on hub with long arm on medium to low grip. These two setups will work well everywhere. On some tracks, if we need more rotation in corners, or if we need the rear to stay more level on high grip, we move the link out, to outer tower and outer hub.
Sway Bars
The stock setting is 2.3mm front, 2.5mm rear. The sway bars are a very effective way to adjust the car. Sway bars and down travel are actually enough to make the car comfortable to drive on any track! A thinner front bar gives more steering. A thicker front bar reduces steering, but increases response, and can actually make the car harder to drive. A thinner rear sway bar adds rear grip, but makes the car unstable on power if there is traction. A thicker bar is often the way to go, helping the car to stay flat and maintain its’ composure while cornering and accelerating. A preferred set up is actually 2.2mm front, 2.6mm rear, and on higher grip 2.4mm front, 2.8mm rear.
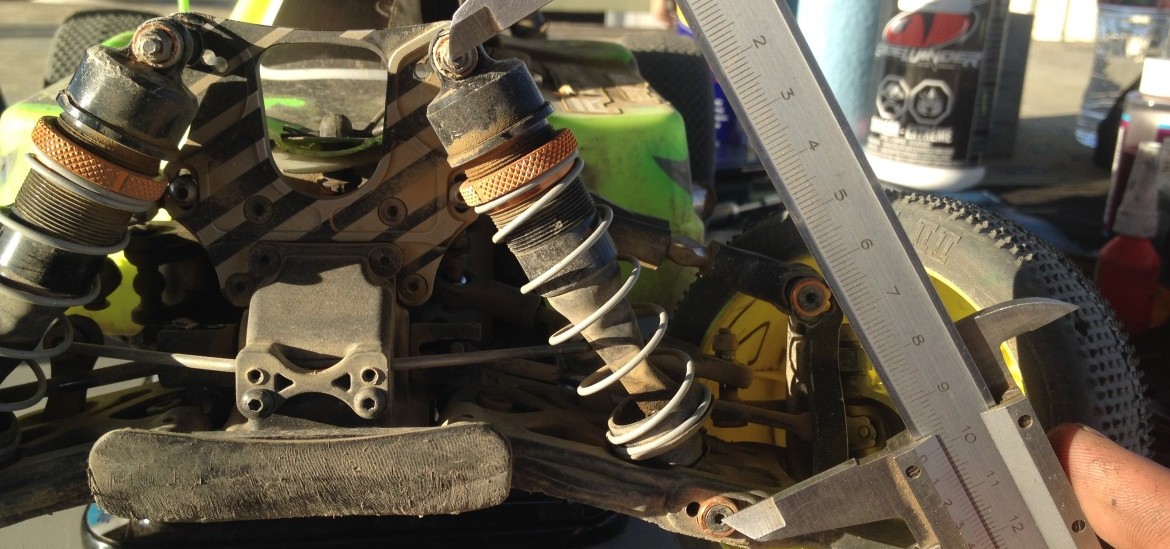
Down Travel
After extensive testing, we have found, that the best shock lengths range from 99mm-102mm front, and 119mm-123mm rear. Down travel is a good setting to play with from track to track. It’s best to start off with the maximum setting and reduce 1mm at a time. The most common setting is 102mm front, 122mm rear, with shocks 1 from outside on towers, and middle arms, resulting in about 60-65mm down travel with tyres on. Please check here for a good post explaining down travel, along with a video.
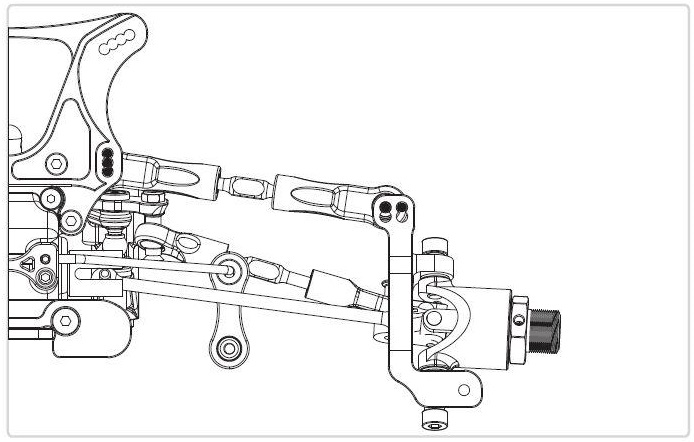
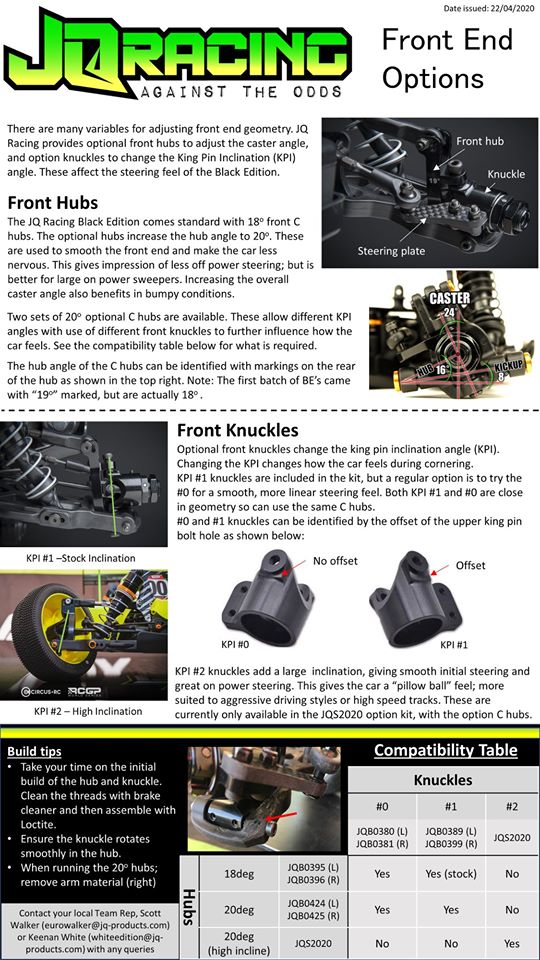
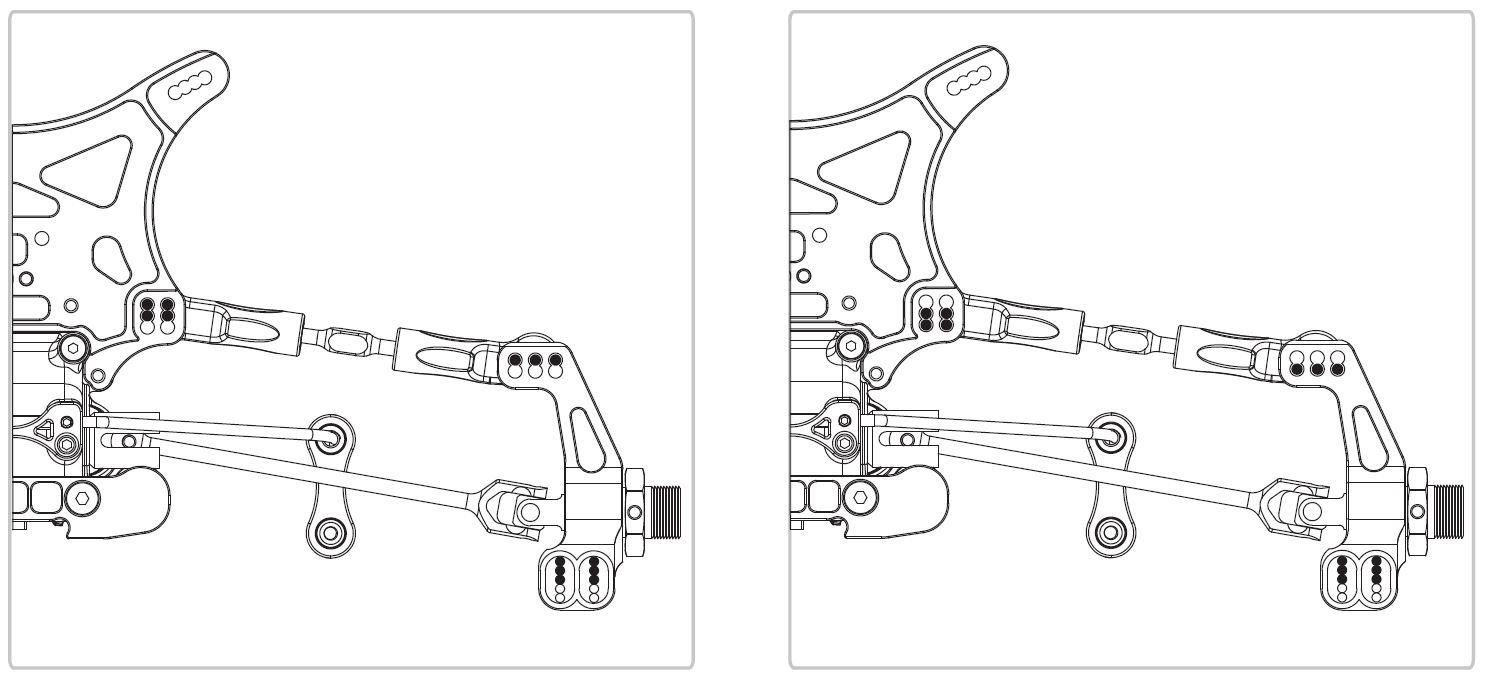
Front End Set Up
The front end is designed to be set up a certain way. Please study the pictures to see which groups of holes are used together for the best performance. Using the links differently than the marked holes, for example top on tower, and low on hub, will make the car unbalanced in certain situations, so they are not recommended.
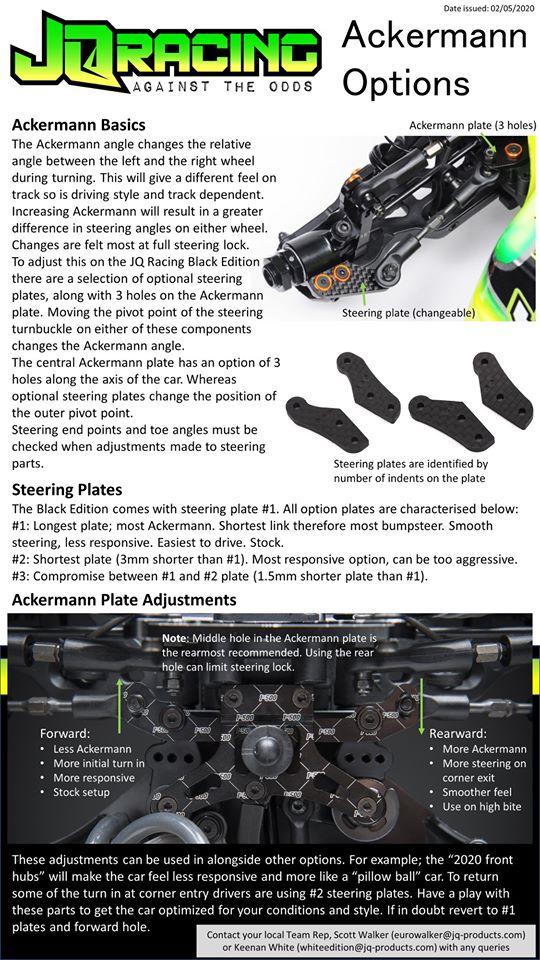
Steering
Steering the car around the track is obviously a big deal. It’s sort of the point of racing, to have the car go where you want it. That’s why we find a set up, and almost never change it. The thing is that when you find a kind of steering you are comfortable with, you will be comfortable with the handling, and it will be predictable. Most of the time the other basic options are better for setting up the car, such as sway bars, springs, down travel, anti squat camber etc.
We almost always run the 18 degree Caster, #1 Carbon Steering Knuckle Arm, front hole on the ackermann plate, with 0 inserts in both A and B plates. This makes for comfortable steering on all tracks.

What you can do is make small adjustments to front camber, bump steer and toe out. Getting these small and often over looked settings right smooths out the steering and makes the car more consistent and easier to drive. More toe out will make the car less responsive and improve it in sweepers. Finding the right camber setting will provide the most consistent steering, a very small amount of camber is preferred. Bump steer changes depending on the upper link position, so use the eccentric link balls, and shims, to reduce it, and bump out slightly as the suspension is compressed.
In extreme conditions we may change something up, but as of the deadline for printing this manual, we have not yet encountered such conditions. As a rule of thumb, if you feel that the steering isn’t smooth on a high grip track, move the link backwards on the ackermann plate. For more, check our website.
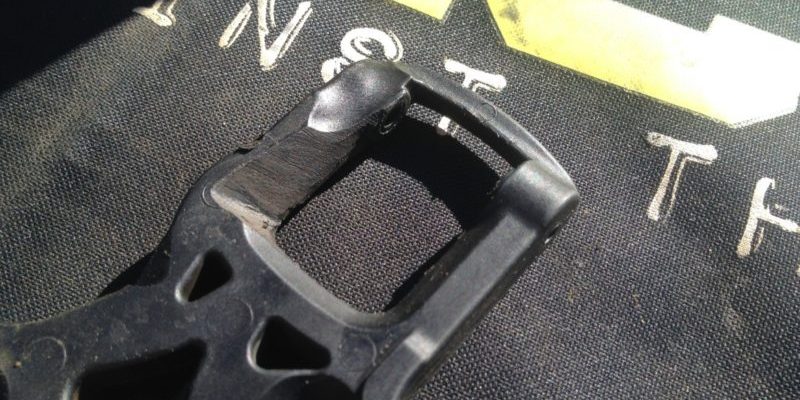
Front Arm Modification
The front arms need grinding in order to increase the down travel. The reason the arms aren’t right from the start, is that originally the front end geometry was quite different. The arm was already moulded when the geometry was changed, and this resulted in the front end not having sufficient down travel. This is why we strongly recommend everyone busts out the dremel and increases the clearance for the c hub, and also for the chassis tab. You need to be able to get 102mm front shock length.
If you enjoy working with the dremel, you can do one more thing. Shave off 2mm off the back of the arm, and use a 2mm shim in front of the arm. This will improve the on power steering of the car, and handling in general. #protip. This way you have one more adjustment to play with.
Rear End Set Up
The rear end is designed in a similar fashion to the front. There are a lot of available options, but only part of them are normally used depending on the rear hub position. After extensive testing we now only use the top 3 heights for the hub, so the insert with the hole up, the insert with the dot up, and the insert with the hole in the middle. Using the holes differently to what is shown above, for example top hole tower, and lower hole hub, will just like the front, cause the car to be unbalanced in certain situations, and is not recommended.
The more you raise the rear hub, (with the middle setting the highest we go), the smoother and less edgy the car is, but it also has less overall rear traction. The suspension also soaks up bumps better. The car can feel good yet be slow, due to a lack of traction and forward bite out of corners. Using higher holes (lowering the hub) will provide more rear traction, but the car may become edgy, resulting in a peak of high traction, and either a crash, or a sudden loss of traction resulting in a spin out. The Roll Centre will change if you change the rear hub location, so if you go from the top hole to the middle, you may want to compensate by raising the link on the tower one hole, or lowering it on the hub one hole. If you go from the middle hub insert to the top hole insert, you may want to try lowering the link on the tower one hole, or raising it on the hub.
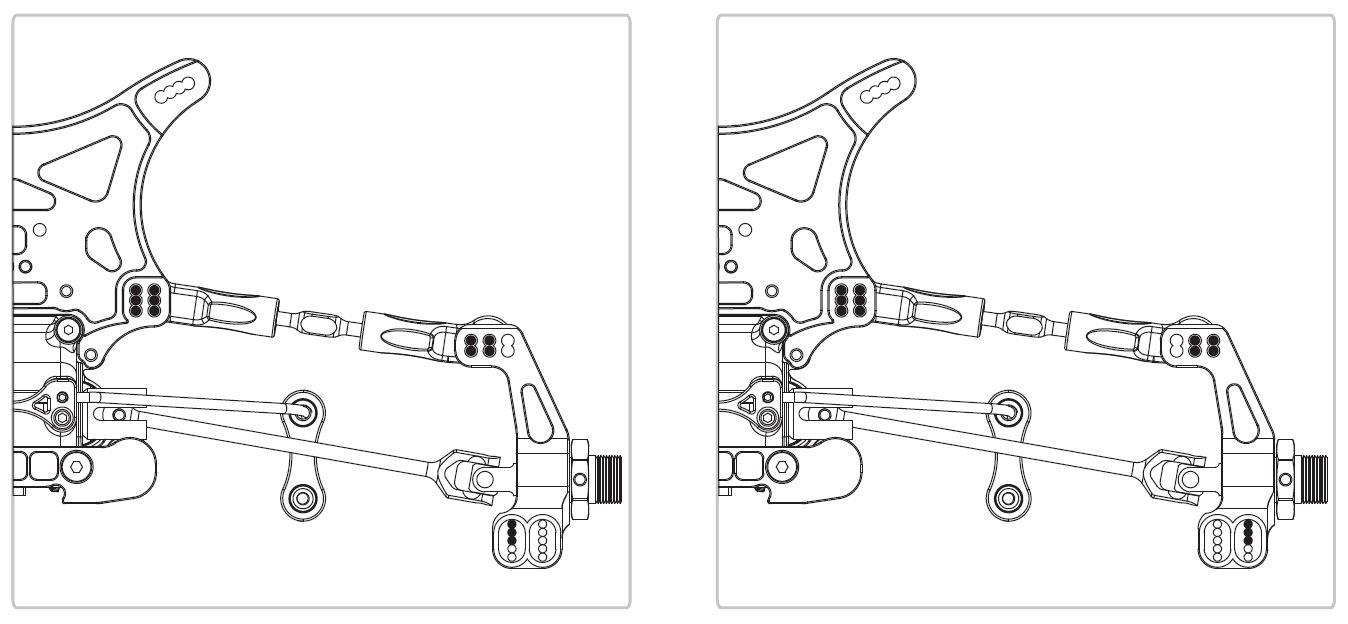
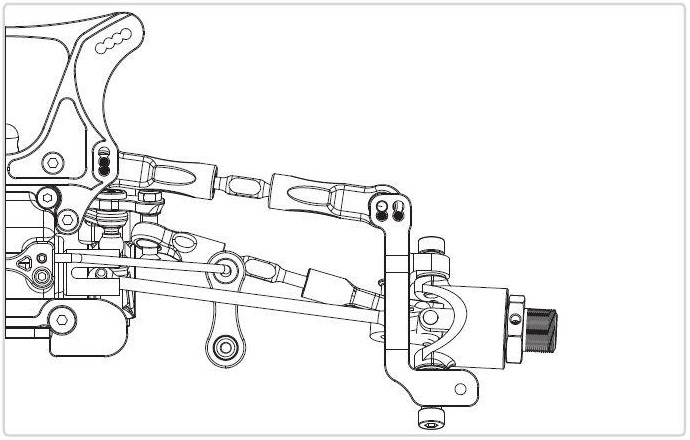
Rear Arm Length
On the rear end it is possible to run the arm long or short. The track width stays the same. The stock setting is running the arm long. Once again, depending on which setting you use, different link holes are used. Please study the pictures. When using the long arm (outer hub hole for the insert), the outer and middle columns for the top link are used on the hub. When using the short arm (inner hub hole for the insert), the middle and inner columns for the top link are used on the hub.
The long arm makes the car more stable, less responsive, easier to drive with less steering, specially in hairpins. The short arm does the opposite, and may be the faster setting, but it is not guaranteed. The short arm can be inconsistent to drive specially on high grip and on bumpy tracks.
The preferred settings on the hub are middle column for the top link when using the long arm, and inner column for the link when using the short arm.
Some Advice: We have found that the long arm set up is preferred in all conditions. Whatever it may lose in absolute fast handling to the short arm set up, it makes up for in it’s stability, forgiving nature, and general smoothness that inspires confidence and fat whips for the kids. We always run the long arm now.
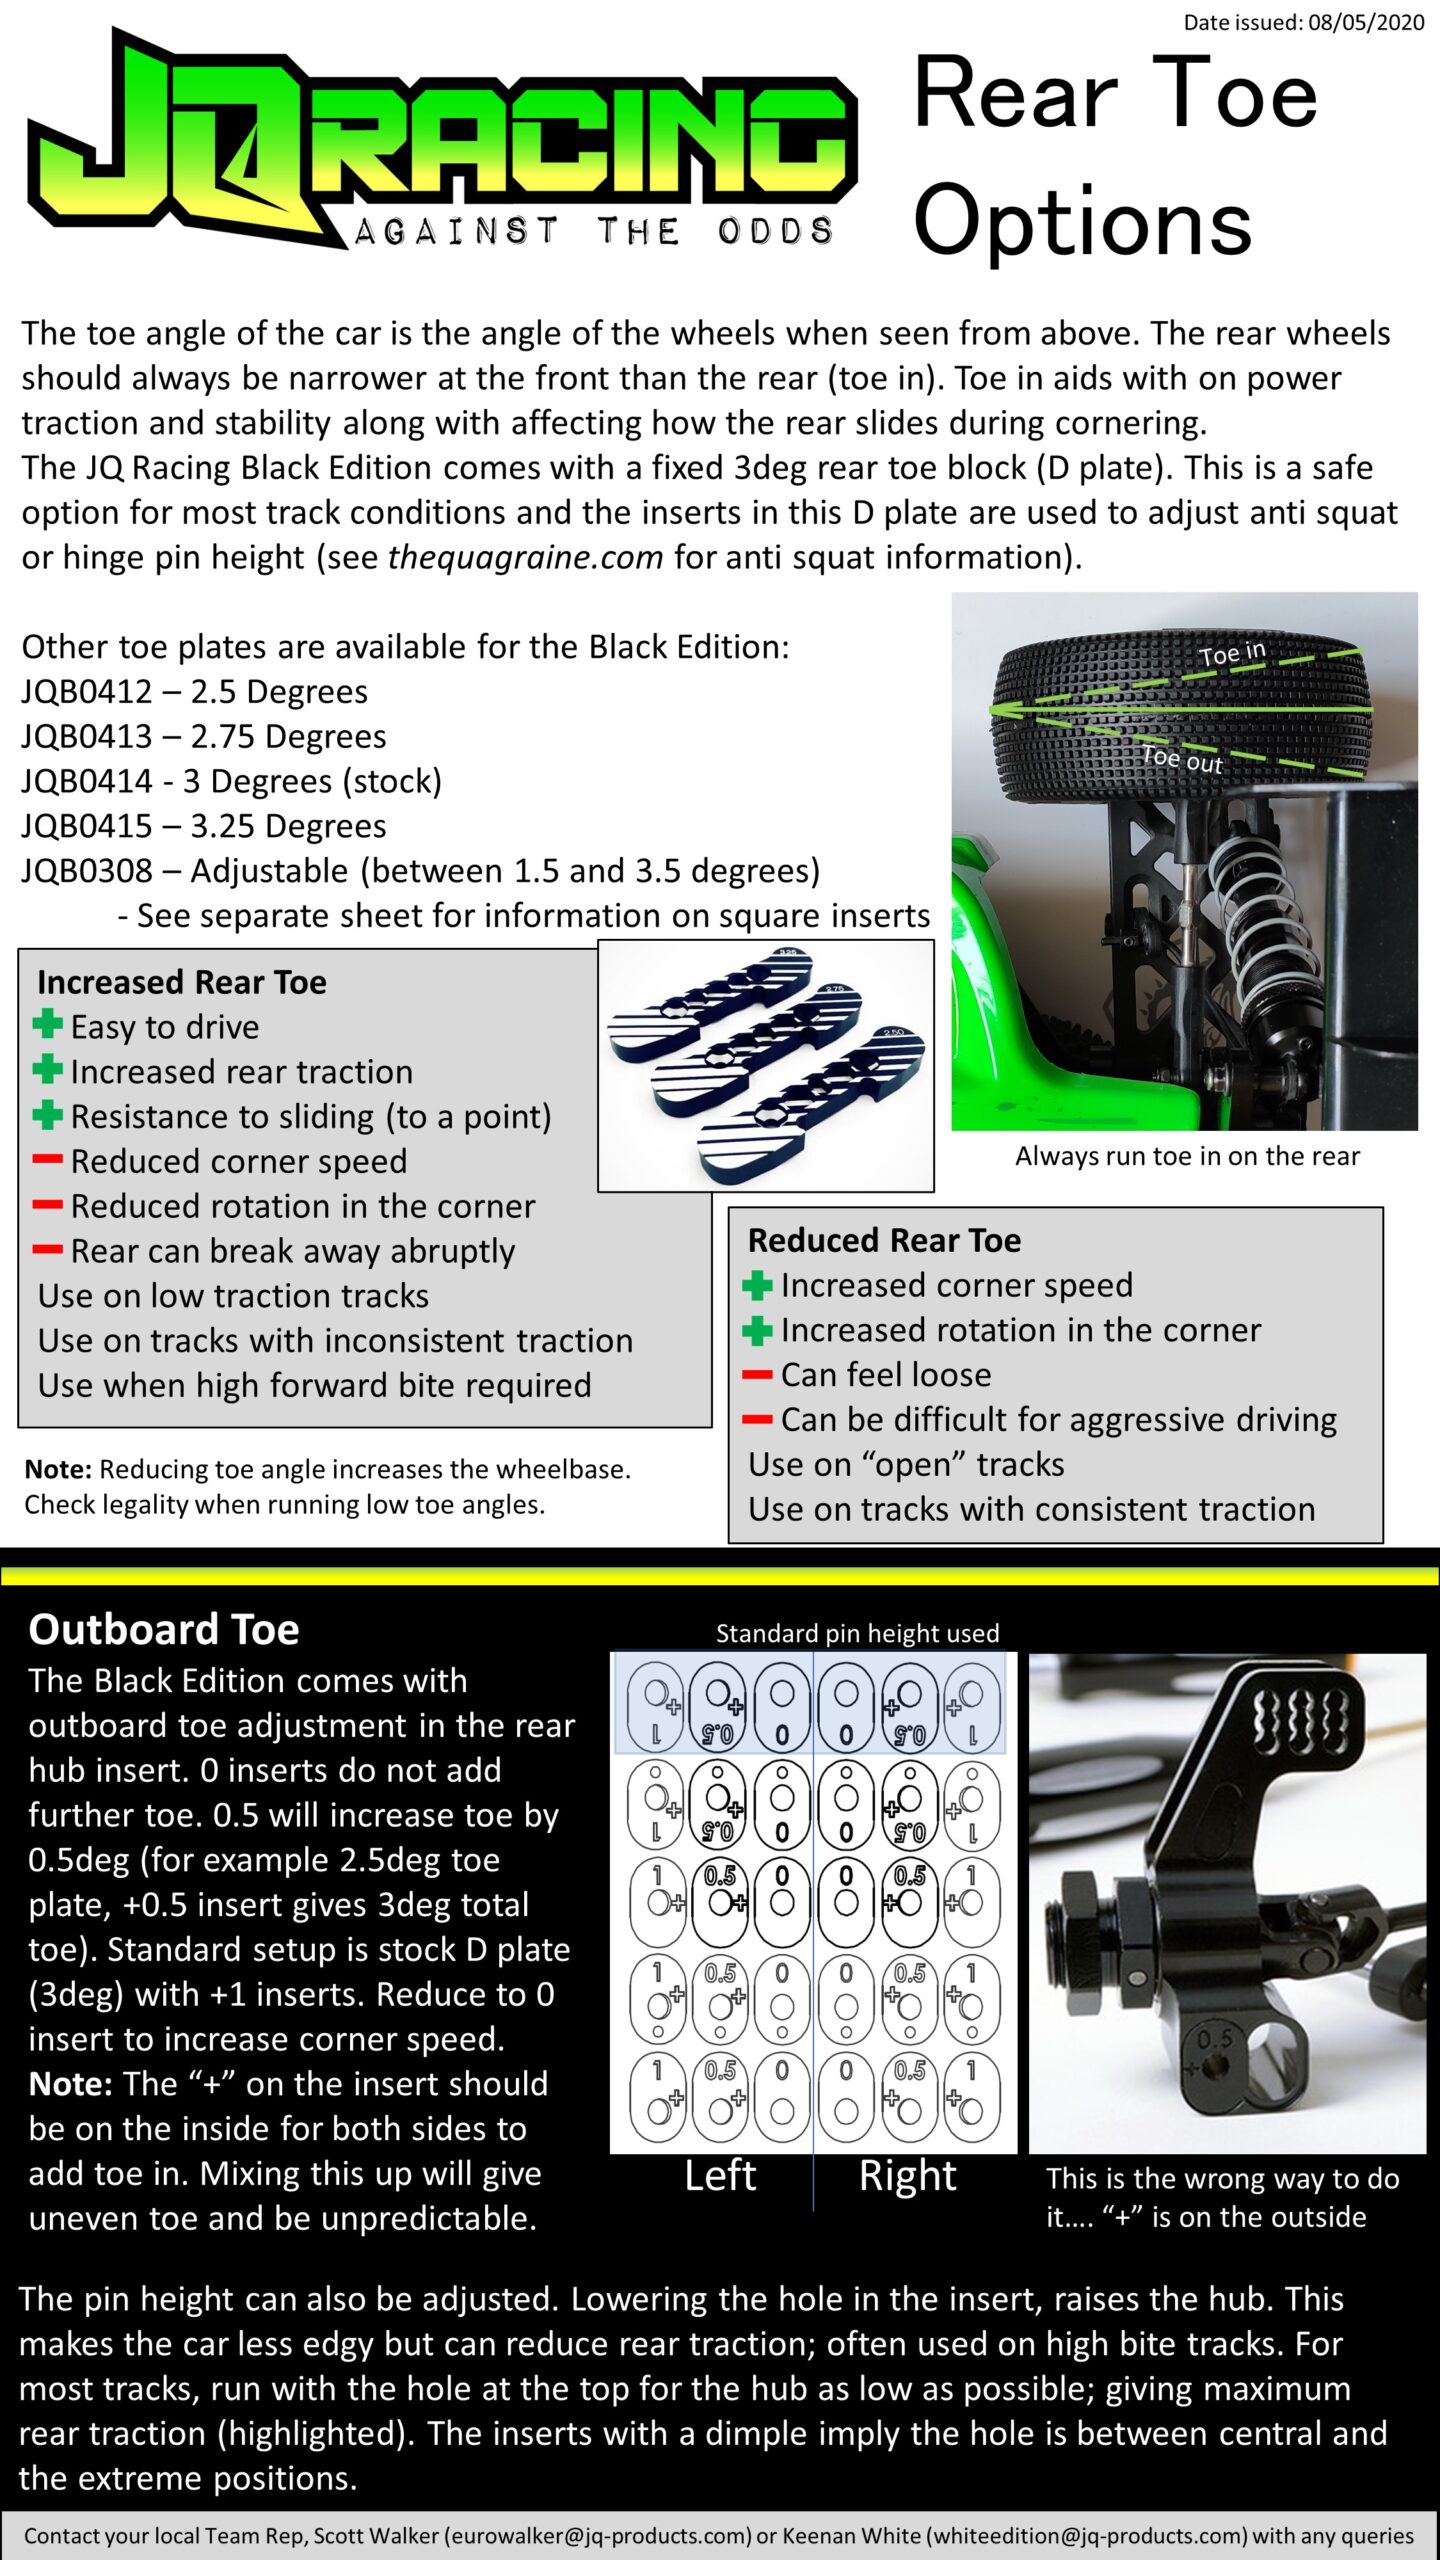
Rear Hub Insert Toe In
The rear hub inserts make it possible for you to set the height of the hinge pin, as well as the toe in amount. 0, 0.5 and 1 refer the amount of toe in, in degrees. The + sign on the 0.5 and 1 degree inserts must always be placed towards the inside. This way toe in is increased. The dot in the insert means that the hole is placed halfway between the middle and the end. The gap between the different hole locations is 1mm, which gives a total movement of 4mm. As mentioned before, we only use the middle (highest hub) to highest hole (lowest hub). That is 2mm of movement.
The toe in increases the rear grip. The 0.5 degree insert really puts the rear end on rails. If you run too much rear toe in, it will noticeably slow the car down, as the rear tyres resist forward movement, and it may cause you to have a false sense of traction, where you have traction up to a point, and then suddenly loose it all. Most of the time 0 or 0.5 inserts are used. For more steering, and a more free rotating and faster feeling car, go to the 0 inserts.
Rear Hub Position
We have 5 possible positions for the rear hub, front to back. However, we only use two of these positions, and recommend that you do so also. Most of the time we run the rear hub with 1 shim in front of the hub. Sometimes on high grip, or on bumpy tracks, we prefer to move the rear hub back one spot, so 2 shims in front of the hub. The stock setting provides the best overall traction and balance for the car. Moving it back one spot improves it in bumps and on high grip. If you want to get really fancy, use 1mm shims and create a position in between!
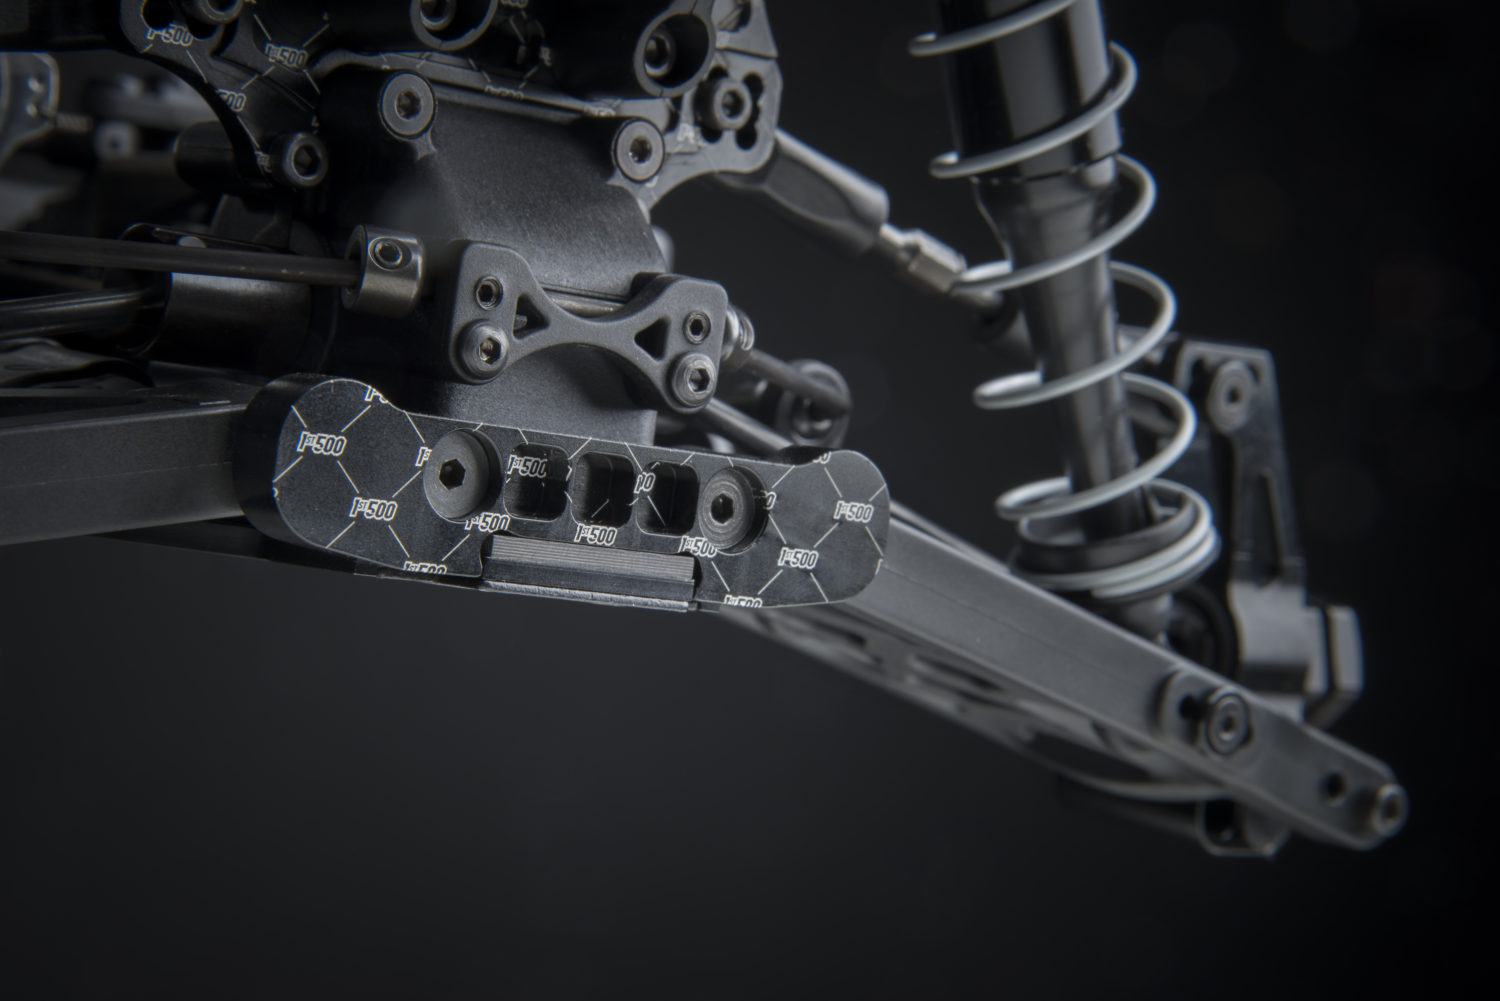
Anti Squat
The most common setting is 0 in the 3 degree stock D-plate (toe in plate), and 1 hole up in the stock C-plate (anti squat plate). This is 2 degrees of anti squat.
With the 0 insert in both plates, the anti squat is 1 degree. Knowing this you will always be able to calculate the amount of anti squat you run.
For example, raising the anti squat insert to nr 1 hole up, increases the anti squat to 2 degrees. If you then lower the insert in the D-plate to 0.5 hole down, it makes it 2.5 degrees anti squat, and so on.
The most common settings are 0.5, 1, 1.5 and 2 degrees of anti squat. The bumpier or more slippery the track is, the less anti squat you run. The smoother and the more grip the track has, the more anti squat you run.
Rear Arm Height
Changing both inserts in the C and D-plates, you can adjust the height of the rear arm while maintaining the same anti squat. Lowering the arm will result in a softer car, that rolls more and has more rear traction. Raising the arm makes the rear end act stiffer, and lowers the grip level. The distance between a 0 and a 0.5 insert is 0.5mm, 0 and a 1 insert 1mm. A change of 0.5mm in arm height is already noticeable!
We almost always run the rear arm height with a 0 in the D-plate, adjusting the anti squat in the C-plate. Sometimes we look for more grip by lowering the arm 0.5 from our setting.
Toe In
The stock toe in plate is 3 degrees, and will work well everywhere. If you want more steering, and more corner speed, you can try the 2.75 or the 2.5 degree toe in plates. And if you are really serious about dialing in your car, you can try…
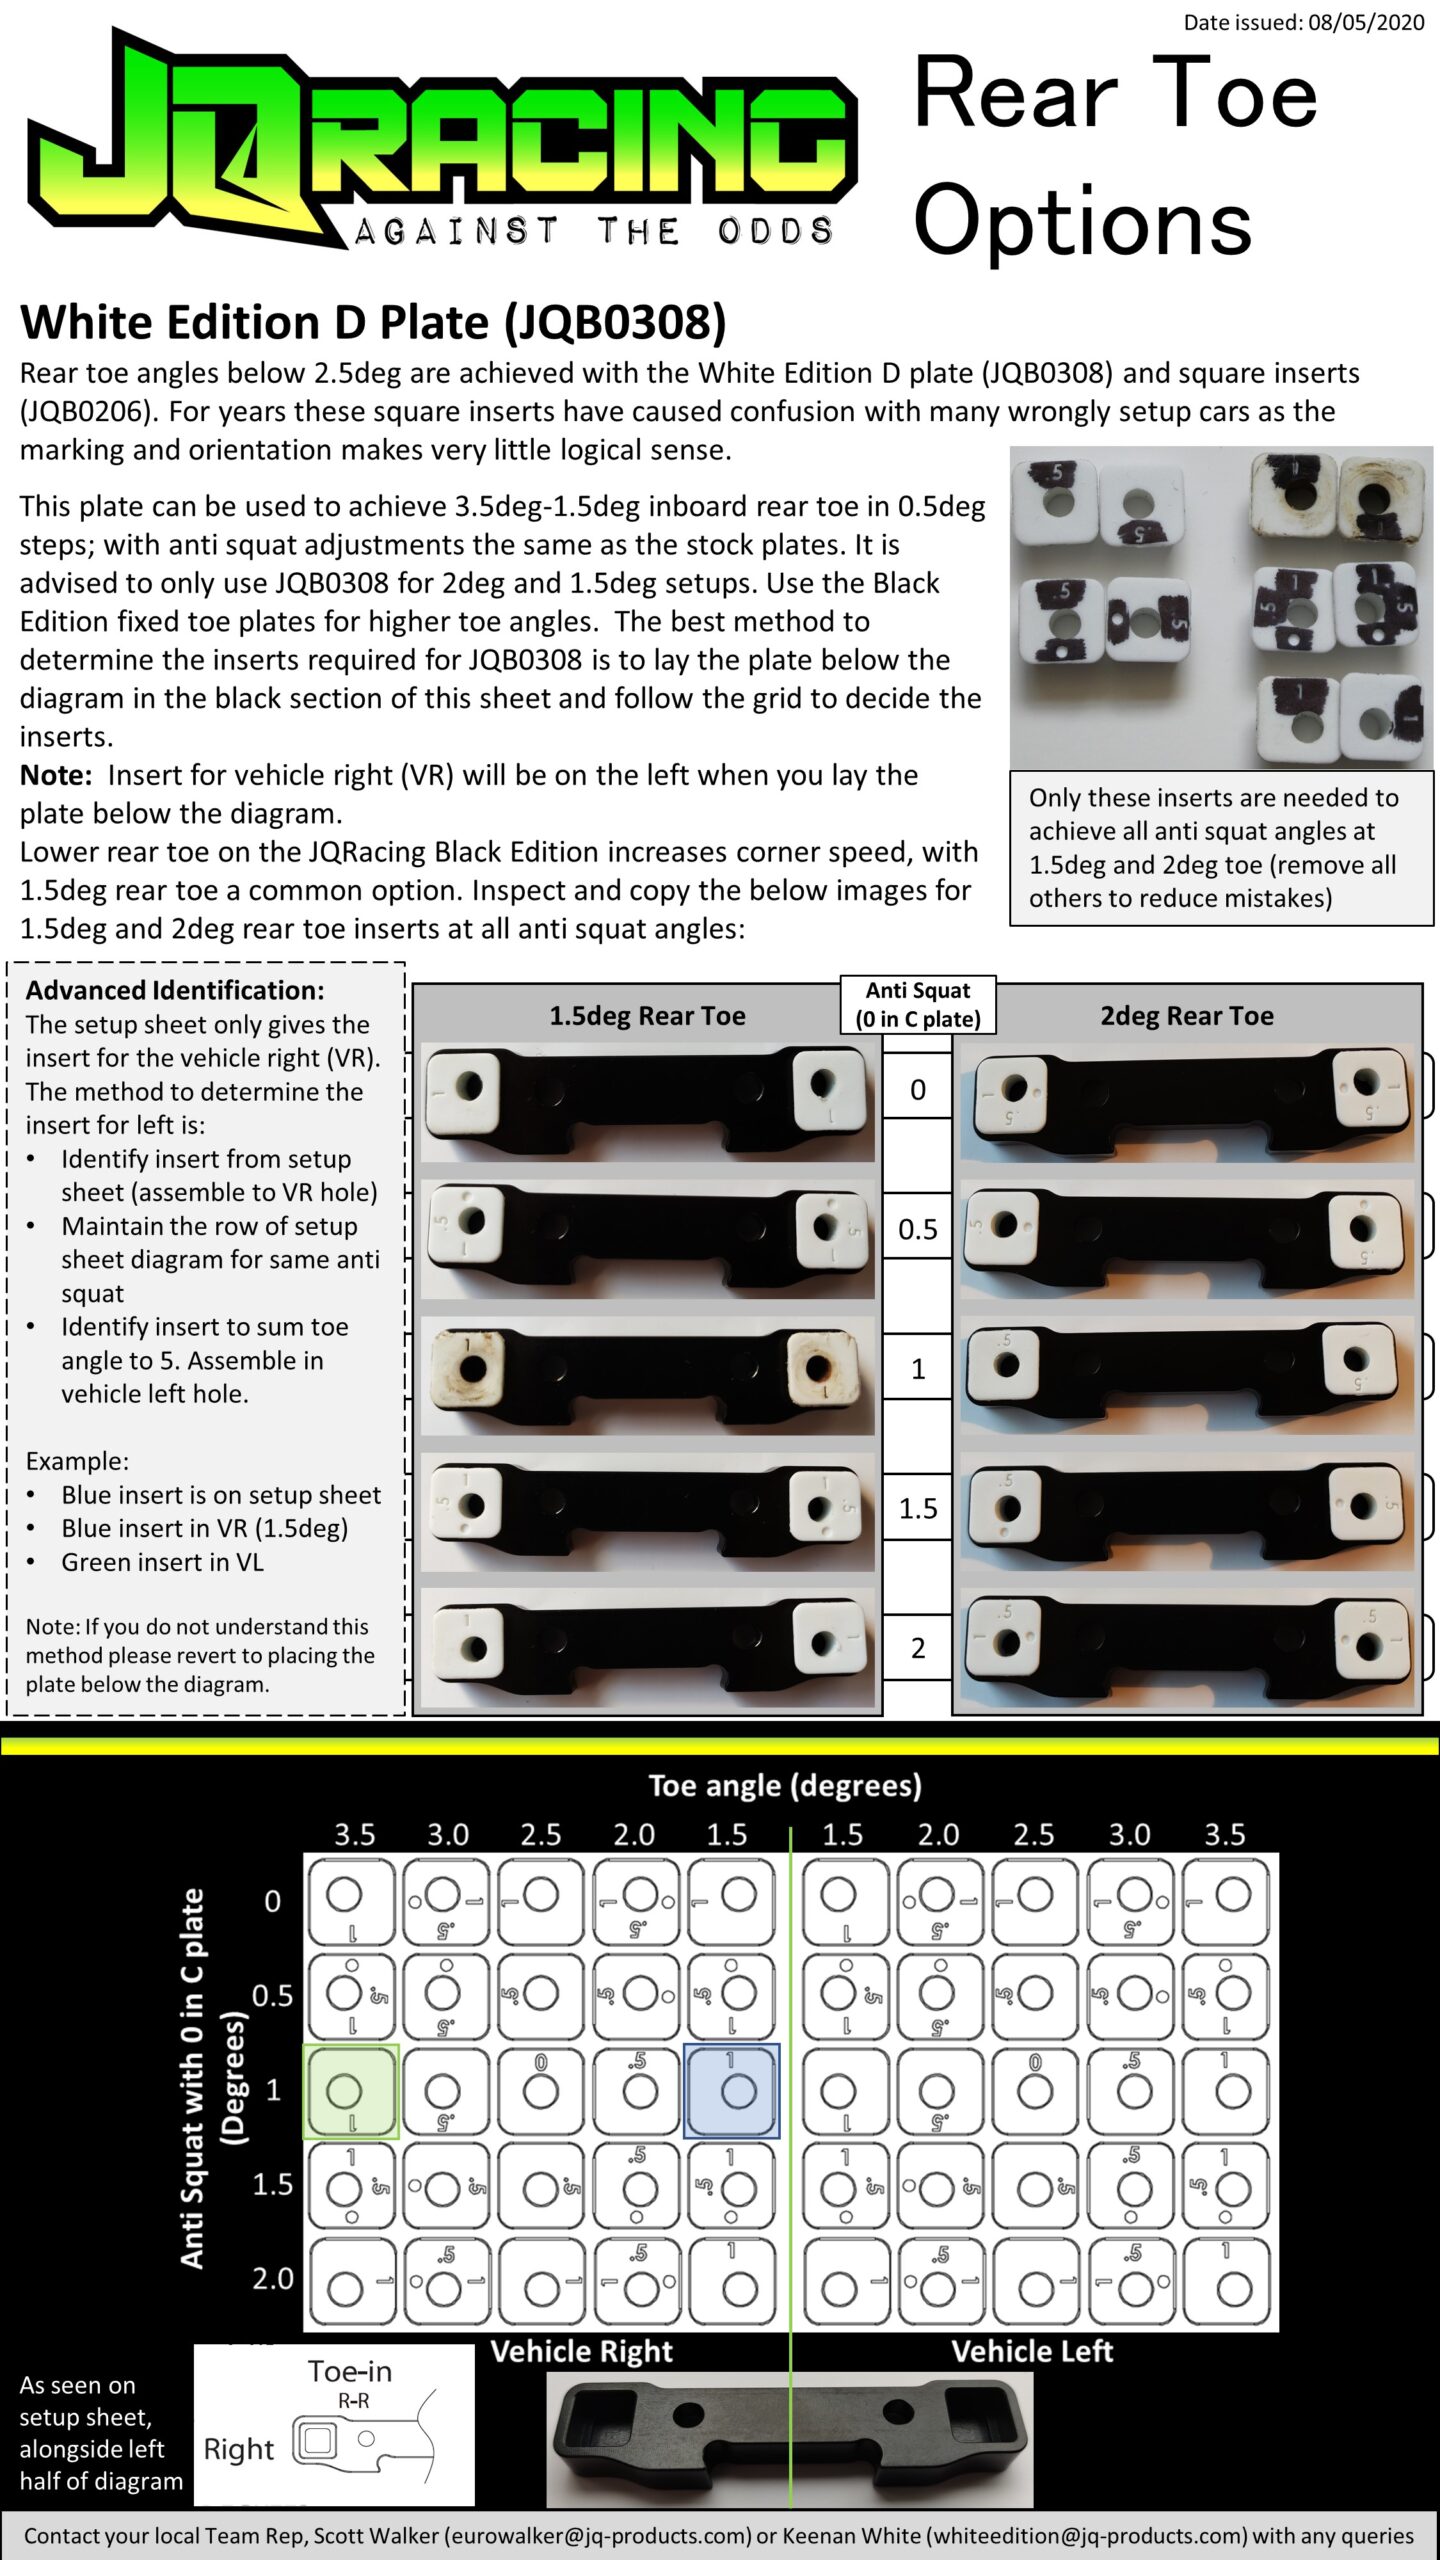
OPTION – Square Toe Inserts
The stock setting is 0.5 insert hole out. This results in 3 degrees of toe in. The angles/inserts work just like for anti squat, so going to nr 1 hole out, increases toe in to 3.5 degrees.
Vertically the heights are the same as on the stock plate.
Unfortunately our know-it-all designer had a bit of a bad day when designing the markings for the inserts, and they don’t really make any sense at all. The best way to understand what is going on, is to either keep the manual handy, or look at the back side of the inserts, there you can easier see the placement of the hole, if it is in the middle, half way to one side, or all the way. We would like to apologise for the inconvenience, and would like to let you know that our know-it-all designer has been punished.

Suspension
We like to work very hard on the suspension, so you can keep it simple. Basically you can run the stock suspension settings on all tracks, and just adjust the oils to the temperature. Grey springs front and rear, 7 x 1.2 front, 7 x 1.4 rear. Oils should be approximately 350cst (27.5wt) front, 400cst (30wt) rear on a Finnish summer day (20 degrees).
NOTE: After production, we discovered what we believe to be an even better suspension setting. 7×1.25 front, 7×1.35 rear, 50cst (2.5wt) thicker front, and thinner rear than with stock. So 400cst (30wt) front and 350cst (27.5wt) rear at 20deg, or the same oil front and back, so either 400/400 (30/30) or 350/350 (27.5/27.5)
You can also try 5 x 1.4 front pistons on the front, which works specially well on high grip flat tracks. Another thing to try is conical pistons, flat side up for a more responsive car, with more grip, and flat side down for more corner speed on flat tracks. However, the flat pistons are the safest bet, they will always work!
For hot weather and medium to high grip tracks, we recommend running harder springs, the JQ black, or new springs we are working on, which may or may not be released when you are reading this. Before that, you can run the HB yellow springs front and back, as they work well in high grip conditions, or if the car feels soft on the track. Check our website for our latest set ups.
The stock shock locations will also work well on all tracks. You can try standing the shocks up on high grip, or leaning them over on low grip, or bumpy tracks. You can stand up the rear, and leave the fronts where they are, for less steering and more stability on difficult tracks. Leaning just the rear shocks in on the tower, will give the car slightly more rotation in tight corners. You can lean the front over if you want more steering also. You can stand front and rear shocks up 1 hole at a time if you want the car to jump more and land better.
We never move the shocks on the arm. We always run the middle holes, and recommend you do so too.
Differentials
On the Black Edition you can get a way with running a lot thicker diffs than before. The front ranges from 5-15k, the centre from 6-20k, and the rear from 3-15K. The thicker diffs just provide more drive, and make the car faster and easier to drive on higher grip tracks. If the car becomes hard to drive on loose or bumpy tracks, you should try thinner diff oils. Normal setups are 7-7-3, 10-10-4, and even a lot thicker, like 12.5-20-4.
The front diff affects steering the most, a thinner diff will have more off power steering, leading to a more twitchy car. It will have less on power steering, but the increased off power steering will create a sense of more overall steering.
A thicker front diff will add drive out of corners, and improve on power steering. It will make the car push a bit more entering corners, making it easier to drive.
A thinner centre diff will make the car easier to drive on power, so acceleration will be slower, but more controllable. It can however also make the car more nervous and erratic on high grip tracks, where a thicker centre diff will transfer power more smoothly and evenly, and would actually make the car more stable, and faster. A thinner centre diff will also have less off power steering, mainly noticeable entering hair pins for example.
A thicker centre diff will produce a lot more forward drive, but it can make the car harder to drive on slippery, or bumpy tracks. It can make the rear end want to step out when accelerating. It will also have more off power steering.
A thinner rear diff will have more off power steering, and can cause the rear end to spin out in hairpins for example. Exiting the corner will be easier and the rear will have more traction, although overall acceleration will be lower.
A thicker rear diff will have less off power steering and the car will push a bit more on entry. It can make the car easier to drive off power for this reason. On power, exiting the corner, the car will have more drive and acceleration, but it can make the rear loose due to this, and you have to be more careful with the throttle.
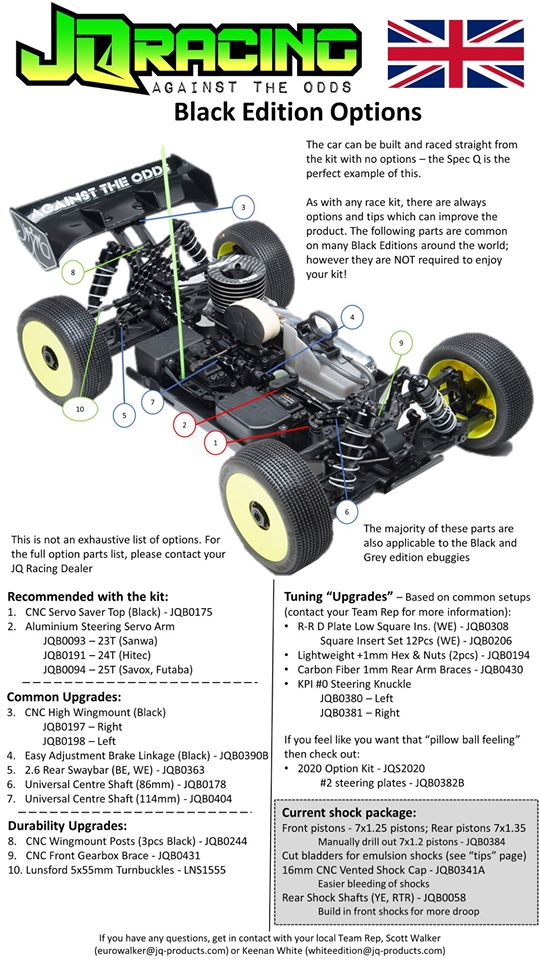
Recommended Option Parts
There aren’t many option parts needed, but we do recommend you get the following parts:
JQB0194: +1mm wheel hexes. We run these front and rear for slightly more grip and stability.
QB0197/198 or JQB0349/350: CNC High Wingmount for added stability.
JQB0175/287: CNC Servo Saver Top for added strength.
Smooth vs Bumpy Tracks
For a really bumpy track, the things you should try are reducing the rear anti squat, buy using insert 1 hole up on the R-R (D-plate), or 0 inserts in both, which results in a lower arm, and a bit more grip. Both these options make the anti squat 1 degree from original 2. You can also go to 0.5 insert lower on the R-F (C-plate) to further reduce it to 0.5 degrees anti squat. The car will handle the rough stuff better, but it will have less pop off jumps, and on rough jump faces the rear might kick up if you don’t hit it perfect. You will also have a bit less steering.
You should also try maximum front kick up, by going to a 1 insert hole down on the F-R (B-plate). This will make the car smoother in the bumps. It’s not as a big of a change as the anti squat, but doing both together really improves the car in bumps.
Finally you should try moving the rear hub back 1 step, to the middle. This normally helps the car go through the bumps.
Those three changes are really the only changes I make. If it still doesn’t feel right, I try different diff oils, usually thinner oils are easier to drive, so maybe 6-6-3, or 8-5-3, it depends on the situation.
In Conclusion
Smooth Track
- Stock setup
- Try slightly less down travel, 1-2mm shock length.
- 25-27 ride height.
- Thicker swaybars, specially on the rear, 2.6, 2.8.
Bumpy Track
- Less anti squat
- Move rear hub 2 step back
- Thinner diff oils, 6-6-3

High vs Low Grip Tracks
The standard setup should always work, but what I have found, is that for a low grip track, I just go to one thinner sway bar on the rear, a 2.4mm. That’s normally it. I leave the front one. I may also reduce camber, and even run 0-0.5 front and 1 rear. These changes give the car a bit more traction, and give the rear a bit more grip vs the front, which makes the car easier to drive. If the balance is good, but I need the car to roll more and generate more traction overall, I will just go to 2.2 front, 2.4 rear sway bars.
Another good change to make on a loose track, is to just lower the upper links, front and rear on the hubs, to the lower row. Keep everything else the same, just lower the links. This makes the car feel more connected and stuck to the track. If it doesn’t feel right, try lowering the links on the tower too. So basically you are going one step lower on tower and hub, maintaining the same link angle, just lowering it. When the traction goes up, the car will want to flip over easier, and that is why I start off with the links high.
On a high grip track, the basic setup is really good. If its really high, and also high speed, maybe go to thicker sway bars, 2.4/2.6. If needed, maybe up to 2.8 on the rear. Harder springs could also be good, specially on the front. I have found that in addition to the JQ black springs, you may want to try the HB Gold and Yellow springs on high bite tracks. Harder diffs also make life easier, going up to for example 12.5-10-5 on a very high bite track.
Another good setup change is to move the rear hub 1 step back, so it is in the middle. Also make sure you aren’t running a too high ride height. Lowering the car a bit on high bite helps, for example 25-26mm front, 26-27mm rear, or same front and rear. finally reducing the down travel slightly, by only 1-2mm of shock length usually helps get the car around the track. Most of the time however, tracks get a bit rough and hard to drive in the mains, and I end up running my normal down travel for the mains.
On a high bite track the stock arm positions tend to work best. Harder springs and sway bars, rear hub back, and thicker diff oils are really the only required changes in order to make the car comfortable to drive.
In Conclusion
High Grip
- Harder springs, JQ black, HB gold front, HB yellow front and rear.
- Thicker sway bars, 2.4 front, 2.6 or 2.8 rear. Thicker front sway bar may actually make car more nervous, try it to see.
- Rear hub one step back to middle.
- Thicker diff oils, 10-10-5, 12.5-8-5, 12.5-20-4. Play around, find what you like.
- Move steering link on ackermann plate to the rear, to smooth out steering.
- Try slightly less down travel, 1-2mm shock length.
Low Grip
- Keep grey springs
- Lower links 1 hole on tower and hub from where you are running them, front and rear.
- Thinner sway bars, 2.2/2.4, or keep front 2.3 if car has too much steering.
- Thinner diffs, 6-6-3 works really well.
- You can try 1 deg rear anti squat for more traction.
Gearing Explained
The difference between the Smooth Gearing 43/13, 46-48/13, 43/13, and the Even Smoother 45/14, 47-49/13, 45/14 is noticeable, but quite tricky to explain, because it’s not quite straight forward. In general, the 43/13 gearing is ”punchier”, you need less run up to jumps in order to clear them, as the car accelerates harder, it’s better for small tight tracks. The even smoother, 45/14 gearing maintains momentum better, but doesn’t accelerate as fast from a low speed to clear a jump for example. So you could say, smooth gearing, 43/13 for tight technical tracks, and even smoother 45/14 for large, fast, sweeping ”euro style” tracks, but you would be mistaken, and here is why.
With the smooth gearing, 43/13, the car accelerates more, but not initially. Say you let off the throttle for a corner, the car slows more, so it is easier to control. Then you add just a little of throttle, and the car won’t do much, at first, you need to pull the trigger or push the stick more, you need to get deeper into the throttle before the car really starts accelerating, so you don’t need to be so careful and precise. Basically you can stay in control, and drive around the track with more throttle applied.
If you look at the video above, the sections where this was really evident was the right hand corners at 9 seconds and at 16 seconds, where after changing to this gearing I actually stopped because I wasn’t pulling the throttle enough. Also at 13 seconds, accelerating up to the jump I needed to apply more throttle, however, let’s say I made a mistake in the corner and lost all my speed, I could now easily clear the jump, where before I had to maintain my speed. Finally, the whole section starting at 25 seconds all the way to the back of the track, I had to use more throttle, so it felt like I was driving more punched to go fast.
43/13 Smooth Gearing: Basically you can stay in control, and drive around the track with more throttle applied.
With the even smoother 45/14 gearing, the car naturally carries more corner speed, so you have to make sure to brake enough to slow down. Also, when you then just barely touch the throttle, the car will go a lot more, so you can’t pull the trigger too much, you have to ”baby” it around corners more. You also need to maintain your momentum and flow around the track. It’s not as good if you point and shoot, then you are better off with the smooth gearing, 43/13. However, it has been our experience, that average racers prefer the even smoother gearing, and that is why we include it as stock with the LV kits. It takes less effort, and less throttle to go fast, and traction is very consistent.
If you look at the video above, it’s the opposite to before, the sections where the gearing was really evident was the right hand corners at 9 seconds and at 16 seconds, where with the even smoother gearing the car will maintain it’s speed, and you just barely touch the throttle. Also at 13 seconds, accelerating up to the jump I needed to make sure to maintain my speed to easily clear the jump. Finally, the whole section starting at 25 seconds all the way to the back of the track, I was barely using the throttle while cornering, and it was easier to flow around this section and maintain corner speed.
45/14 Even Smoother Gearing: It takes less effort, and less throttle to go fast, and traction is very consistent.
The gearing isn’t really a setup change that is used from track to track. Both produce the same lap times, it comes down to driver preference. It’s hard for me to even decide on which one I prefer. The past couple of years I have been racing with the even smoother gearing, now I am giving the smooth gearing a try.
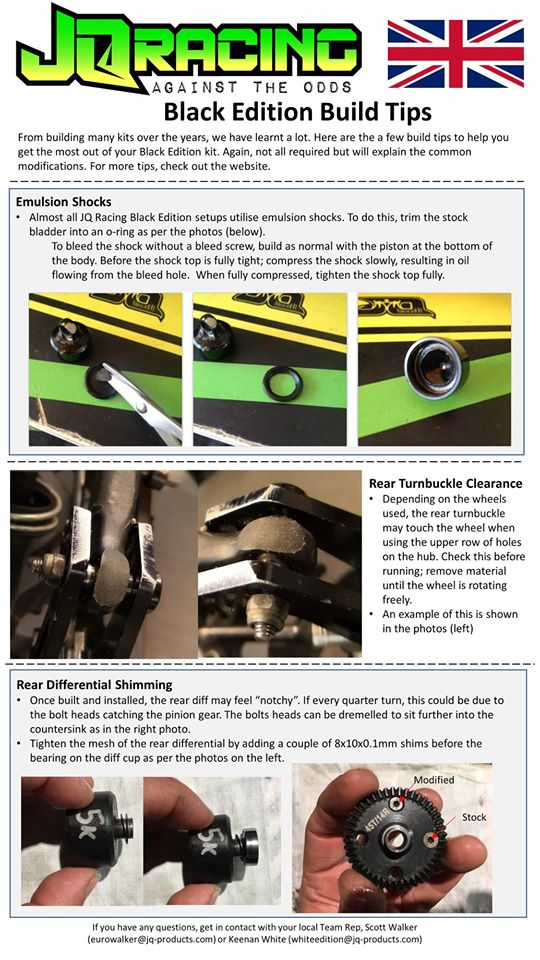
Shock Bladders
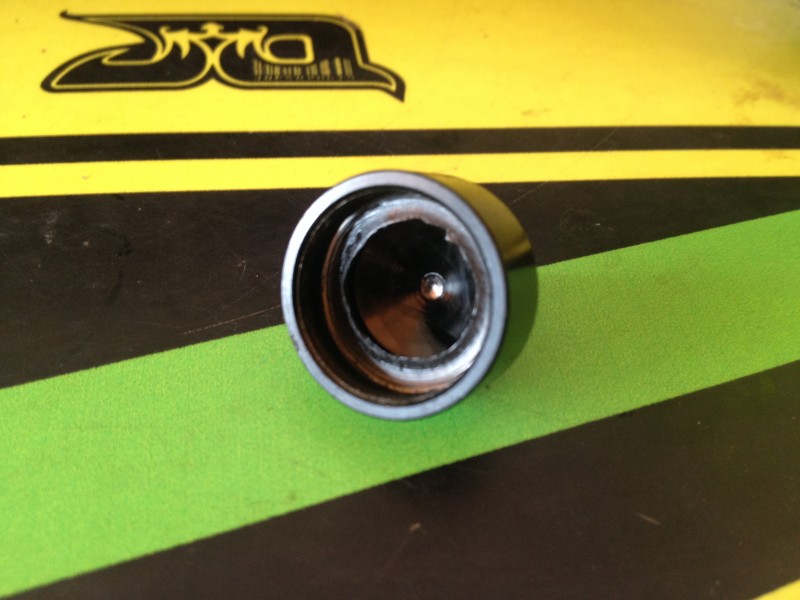
As THECar is now performing very well, we have began experimenting with other setup features that have been popular over the last few years. One such thing is the bladders. What we have found is that cutting the stock bladder so it is basically an O-ring, and building the shocks as emulsion shocks, the car feels more plush, and holds it’s line better in long corners, indicating that it has more grip, it’s slightly more locked in. However, the biggest difference is how it pops off jumps and lands. It pops less, and doesn’t want to ”double-bounce” on landing. It just lands and soaks it up nicely. It’s easier to drive the car specially in situations where you land a jump into a corner and have to immediately accelerate into the next section. The car settles faster and just goes.
If you look at the video above, the step on step off is one area where you notice a difference. The car lands and settles better when jumping on, which makes jumping off easier, even though you do lose a bit of “pop” on the jump. When jumping off it is also easier to carry speed through the corner and into the next section.
Another area where the emulsion shocks were clearly better, was flat landing at 34 seconds, and maybe most evidently negotiating the following double double and accelerating onto the front straight. Where before you had to be careful, land well, and then accelerate, now it was a lot easier and did not require the same precision.
So for now we are running emulsion. I can see emulsion being worse on very high traction, or when you need more snappy response and “pop” over jumps. Again, both bladders and emulsion works, but emulsion is easier to drive.
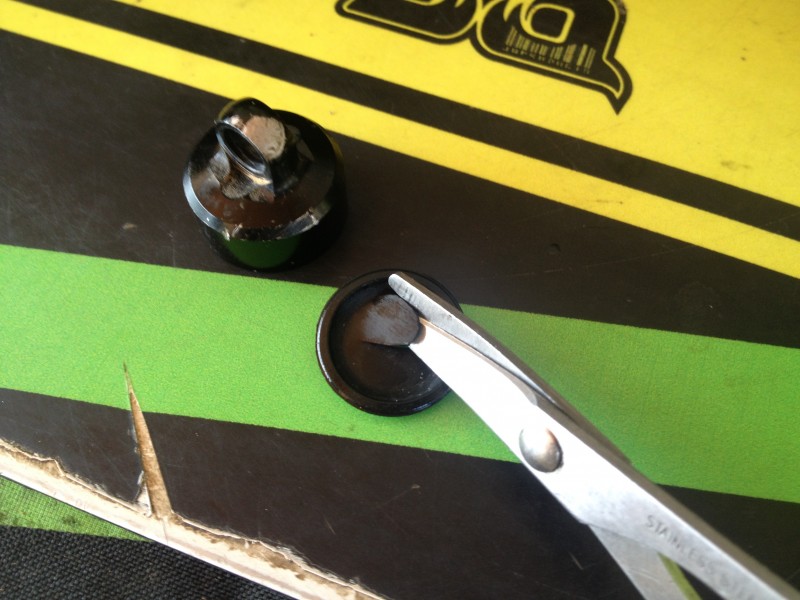

To build the emulsion shocks, you follow the exact same steps as with a regular shock with a bladder. I put a bit of oil in the cap too. I screw the cap on a turn or two, hold the shock at an angle with the bleed hole facing up, push the shaft in so 3mm remains visible, and turn the shock body slowly, letting the excess air and oil out. If you can feel the damping get harder as you move the shock shaft in when you are done, open the cap 3/4 of the way, with the shaft extended, and repeat the process. I build the shocks so they are dead. After working the shock for a few seconds the shaft remains where I leave it with 3mm visible.
Important Advice
One thing we realised with the original WE was that some drivers would exaggerate their setup changes. For example, if we say a long link is more stable, they would go to a link which was as long as possible. That doesn’t really work with setting up a car, a change in a certain direction will be better up to a point, and then going too far will be worse again. We have eliminated a lot of these possibilities now, but please keep this in mind.
The setups mentioned in this guide work well, and are close to what you will want. This means, that we recommend you stay close to what we post. If you are not happy with the handling, it is most likely as easy as adjusting for example your down travel by 1-2mm shock length, camber by 1-1.5 degrees (0,5-1,5mm link length), sway bar by 0.1-0.2mm and diff oils buy a couple of K. Going overboard is not a solution.
For the most up to date set ups, please check out set up page.
Any Questions
If you have any questions regarding setup, please just email me or Liam, [email protected] or [email protected], or contact us on Facebook. Thank you for your continued support!
Brainstorming Section
What to do, if you want your car to have:
More Overall Steering:
2.5 degree rear toe in (Less rear toe in)
5000 front diff oil (Thinner front diff)
2.1 front swaybar (Thinner front swaybar)
2.6 rear swaybar (Thicker rear swaybar)
Move shock in on front tower
Short rear arm, with inside column for rear link
More Steering Into the Corner (Twitchy):
Ackermann in middle or rear hole
3000-5000 front diff oil (Thinner front diff)
15 deg caster (Less caster)
Front shocks out on tower
Front link in lowest hole on tower
Harder front spring
Steering link middle or rear on ackermann plate
More Steering Mid-to-Exit of the Corner and On-Power:
10-15k front diff oil (Thicker front diff)
20 degree caster (More caster)
Steering link in front hole on ackermann plate
Move front arm 2mm back
Lean front shock in on tower
Less Overall Steering (Stable):
0.5 or 1 degree rear hub insert
#2 Steering knuckle plate
2.5 front and rear swaybar
Long rear arm link in outer column lower hole, inner column middle row on tower.
10k front diff (Thicker front diff)
4-5k rear diff (Thicker rear diff)
Less Steering Into the corner:
10-15k front diff oil (Thicker front diff)
Stand up rear shocks
Steering link in front hole of ackermann plate.
Maximum front kick up.
20 degree caster (More caster)
Less steering out of the corner
3000 front diff oil (Thinner front diff)
Less front down travel
15 degree caster (Less caster)
More Rear Traction:
More rear toe in
0.5 or 1 degree rear hub insert
Top hole rear hub insert (lower hub)
Middle inner tower, middle (or outer) lower hub for rear link, with long rear arm.
Lower rear arm 0.5
Lean rear shock in one hole on tower.
3-5k in centre diff (Thinner diff)
Better Bump Handling:
Lean shocks down one hole on towers
102/123 down travel
29/29 ride height
0.5 hole down for antisquat, with 0 in toe block
Dot up or middle rear hub insert
Thinner diff oils
2 shims in front of rear hub (Rear hub back)
Cut tyre pins, inside and outside rows
More front kickup
More caster
More Acceleration and Forward Traction:
10-15k / 10-15k / 4-5k diff oils (Thicker diffs)
Top hole rear hub insert (Lower hub)
On a high grip track, shorten the rear link on the tower.
On a loose track, lengthen the rear link on the tower.
More stability in long sweeping corners:
2.5 front sway bar (Thicker sway bar)
2.6 or 2.7 rear sway bar (Thicker sway bar)
10-15k / 10-15k / 4-5k diff oils (Thicker diffs)
Harder springs
Less rear droop, by 1-2mm.
Better Jumping Ability:
Stand shocks up 1 or 2 holes
Increase antisquat, 2-3 degrees
1 step thicker shock oils
Max front kickup
102/123 (More down travel)
(mainly for better landing)
What to do first on a high traction track:
1 or 2 steps thicker swaybars, eg. 2.4/2.8
Reduce shock length 1-2mm front and rear, eg. 100/120
25/26 ride height (Lower ride height)
Harder springs
Move link to the rear on ackermann plate
Shorten rear upper link to outside column rear tower, or keep same length and also move it out on hub.
2 shims in front of rear hub (Rear hub back)
What to do first on a low traction track:
Middle inner tower, middle (or outer) lower hub for rear link, with long rear arm
More toe in
0.5 or even 1 rear hub insert
Lower rear arm 0.5
2.4 rear sway bar (Thinner swaybar)
Lean rear shocks over to 1 hole in from middle.
29/29 ride height (Higher ride height)